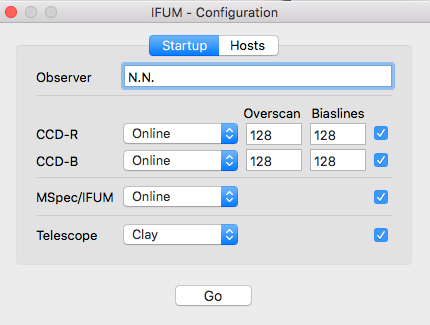
Configuration and Startup
This is the first window after starting the IFUM GUI:
 TODO ADC/DCU
Simulator Mode
- Startup Tab
- The CCD popup-buttons should be set to Simulator
- All other popup-buttons should be set to offline
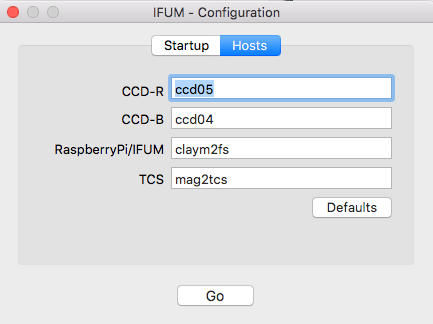
- Hosts Tab
- All Hosts should be set to localhost.
Preferences
General - Camera - IFUM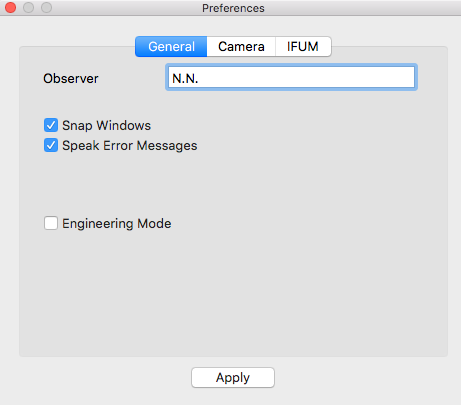
- Observer
- Set the 'OBSERVER' keyword in the FITS header.
- Snap Windows
- Keeps the 'IFUM' and both 'CCD' windows aligned. Any one may be moved, but the other two will follow.
- Speak Error Messages
- The GUI will announce error messages (eg. "invalid exposure time").
- Engineering Mode
- The following warnings are disabled in engineering mode:
- Long (60 seconds) exposure with a small (32k pixels) subraster
- Exposure while the slide is in the LoRes-Swap position
- Exposure while the filter is in Load or None position
- Long (3*LampAutoOff seconds) exposure while any calibration lamp is on
- The following items are only available in engineering mode:
- CCD Voltages window
- LoElevation when the Slide is in HiRes mode
- HiElevation when the Slide is in LoRes mode
- HiAzimuth when the Slide is in LoRes mode
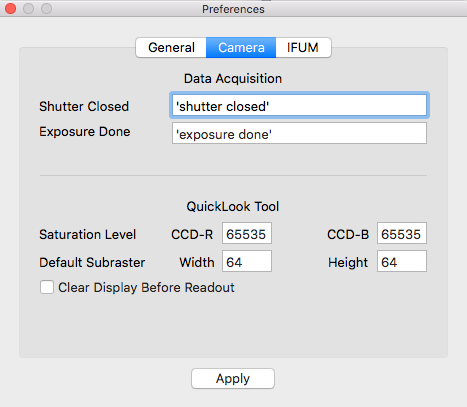
- Shutter Closed
- The text in quotes will be spoken by the system after the
shutter closes. Without quotes the text is interpreted as
a sound file (eg. shutter.mp3). The file has to reside in
~/Library/Application Support/IFUM
or has to include the full absolute path. - Exposure Done
- Same as above for the end-of-exposure in the last exposure of a loop.
- Saturation Level
- Pixels above this value will be displayed in red.
- Default Subraster
- This is the default geometry of a subraster added by the QlTool or when adding a subraster manually without explicitly entering the geometry.
- Clear Display Before Readout
- Clears (blacken) the image in the OverView window before the readout starts.

- Note: Some of following settings might be removed after the
testing phase of IFUM.
- Keep TCP/IP connection open
- If checked then the connection between the IFUM GUI and the RaspberryPi in kept open; if un-checked each communication attempt will open the connection and close it afterwards.
- Quiet Startup
- The IFUM-GUI does not query the full IFUM status at startup.
- Sample Temeratures
- Read the IFUM temperature sensors at a regular interval.
- Watchdog
- The IFUM GUI polls the RaspberryPi at regular intervals to verify that the 'rPi is alive'.
- Alert Sound
- Plays an alert sound when the RaspberryPi is running on batteries or does not respond to watchdog queries.
- "MOVING" query interval
- Interval (in seconds) between queries while any device is moving.
- Lamps AutoOff
- Timeout for the automatic power-off of the calibration lamps. A value of '0' keeps the power on indefinitely.
- ShutDown IFUM-Instrument when GUI closes
- Shut down the RaspberryPi software when the GUI closes. This allows a safe power-down of the instrument.
- Stow
- Move some devices to a safe position:
- All slits to position 1
- LoRes elevation to 89 deg.
- Filter to Load
Main Menu
IFUM - File - Telescope - Instrument - CameraMenu - IFUM
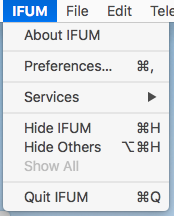
- About: opens a dialog box that shows the IFUM-GUI software version.
- Preferences: opens the Preferences window.
- Quit: closes the IFUM software.
- Preferences: opens the Preferences window.
Menu - File
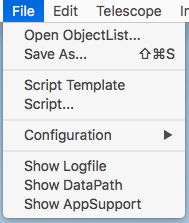

- Open ObjectList: loads an object list and opens the ObjectList window.
- Save As: saves the current object list to the disk.
- Script Template: copies the template script to
- ~/Library/Application Support/IFUM/Scripts/template.scpt
- and opens it in the AppleScript editor. TODO remove AppleScript?
- Script...: display a file selector dialog and opens the
selected file with the AppleScript editor
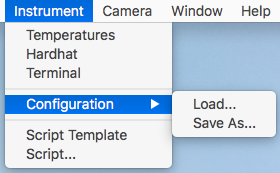
- Configuration-Load...: displays a file selector dialog and loads the selected instrument configuration:
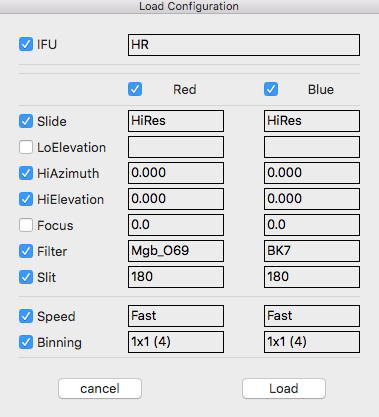
- The Check-Boxes at the top allow to load a configuration for on color only.
- Configuration-SaveAs...: displays a file selector dialog and saves the current instrument configuration.
- Configuration-Folder: opens a Finder window showing the Configurations folder.
- Logfile: Open the instrument logfile using the Console tool.
- DataPath: opens a Finder window showing the current data path(s).
- AppSuport: Opens the "Application Support" folder that contains the directories:
- Configurations
- Object
- Scripts
- Subrasters
Menu - Telescope
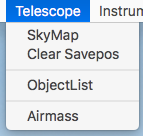
- SkyMap: opens the SkyMap window.
- Clear Savepos: clears all previously marked positions on the SkyMap window.
- ObjectList: opens the ObjectList window.
- Airmass: opens the Airmass window.
- Clear Savepos: clears all previously marked positions on the SkyMap window.
Menu - Instrument
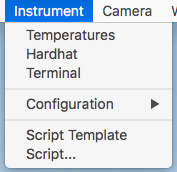
- Temperatures: opens the IFUM Temperatures window.
- Hardhat: opens the IFUM Hardhat window (engineering mode only).
- Terminal: opens the RaspberryPi Terminal window (engineering mode only).
- Configuration-Load...: displays a file selector dialog and loads the selected instrument configuration (see File menu).
- Configuration-SaveAs...: displays a file selector dialog and saves the current instrument configuration (see File menu).
- Hardhat: opens the IFUM Hardhat window (engineering mode only).
Menu - Camera
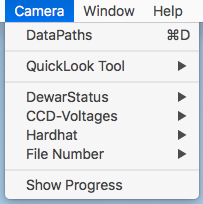
- DataPaths: opens the DataPath Selector window.
- QuickLook Tool: opens the QuickLook Tool windows.
- DewarStatus: opens the Dewar Status window.
- CCD-Voltages: opens the CCD Voltages window (engineering mode only).
- Hardhat: opens the Hardhat window.
- File Number: enables (temporarily) the File number edit on the Camera GUI.
- Note: Existing files will be overwritten without warning.
- Show Progress: Opens a Progress window that displays a countdown until the end of the current exposure loop.
IFUM Instrument Windows
IFUM - Temperatures - Hardhat - TerminalIFUM Main Window
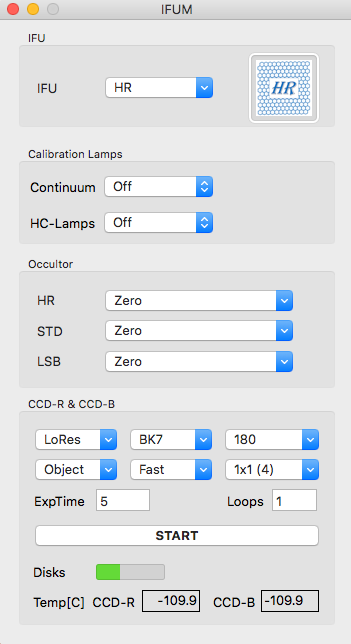
- IFU
- Select the IFU { HR , STD , LSB , STOW } .
- Calibration Lamps
- Continuum: select a named combination of LEDs.
- These combinations are defined on the Hardhat Lamps/Set window.
- HC-Lamps: select a named combination of hollow cathode lamps.
- These combinations are defined on the Hardhat Lamps/Set window.
- CCD-R and CCD-B
- DropDowns (6): Common controls for the
Slide, Filter, Slits,
Exposure Type, Readout Speed and Binning.
- ExpTime: sets the exposure time for both CCDs.
- Loops: sets the number of exposures per loop for both CCDs.
- Start: start an exposure loop for both CCDs.
- Disks: displays the amount of disk space used.
- Temp[C]: displays the CCD temperature .
- ExpTime: sets the exposure time for both CCDs.
IFUM Temperatures
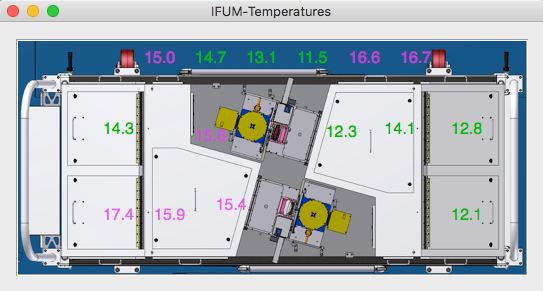
This window shows the temperature [C] at several points within the instrument enclosure.
IFUM Hardhat Window
The IFUM HardHat window is used during engineering or trouble shooting. It allows to move all devices to arbirtrary positions.- Update: Read the full instrument status from tbe RaspberryPi controller.
- Open Logfile: Open the instrument logfile using the Console tool.
- The logfile is written to ~/Library/Logs/IFUM and is renamed every week "ifumYYYY_WW.log".
- Open Configuration-Folder: Open the folder that contains the IFUM Configuration files in the Finder.
Tabs: GES - Disperser - Filters - Focus - Shoes - IFU - Occultor - Lamps/Eng - Lamps/Set
GES Tab
- Encoder: Averaged encoder reading
- Step: Step position
- Nudge: Move the Slide by the given number of steps.
- Calibrate: Run the internal calibration routine of the RaspberryPi software.
- LoRes Swap: Move the slide and the LoRes elevatin to the swap position.
Disperser Tab
- Step: Step position
- +/-: Move the Slide by the given number of steps.
- Calibrate: Run the internal calibration routine of the RaspberryPi software.
Filters Tab
- Set Filter Names
- Take the filter names from the edit-windows on the left and apply them to all filter selection popup menus (CCD- and IFUM windows).
- The names are also stored in the Preferences file and used when the IFUM-GUI is re-started.
- Load
- Move the filter mechanism ot the "Load" position.
- None
- Remove the current filter from the beam.
Focus Tab
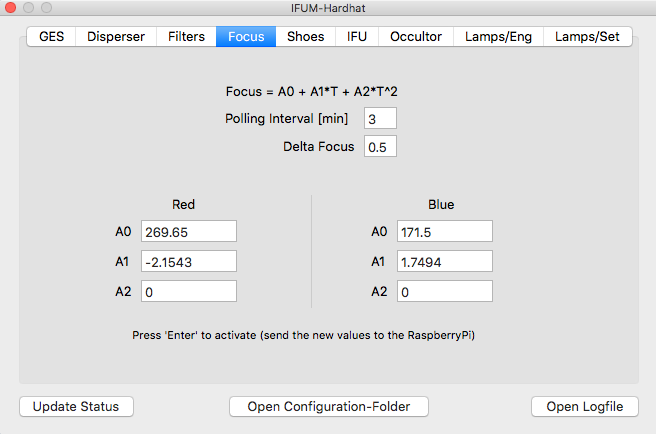
- Focus=: formula to calculate the predicted focus using the A0,A1,A2 parameters defined below.
- Polling Interval: The focus control loops checks the cradle temperature every 3 minutes
- and sends a new focus value to the RaspberryPi if the difference is larger than Delta Focus (see below).
- A0,A1,A2: focus fit parameters.
Shoes
TODO
IFU
TODO
Occultor
TODO
Lamps/Eng Tab
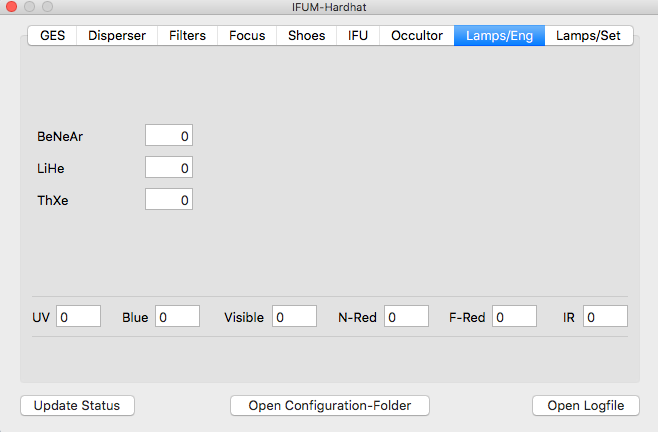
- HC-Lamps: BeNeAr, LiHe, ThXe {0..100}.
- Continuum (LED): UV, Blue, Visible, N-Red, F-Red, IR {0..4096}.
Lamps/Set Tab
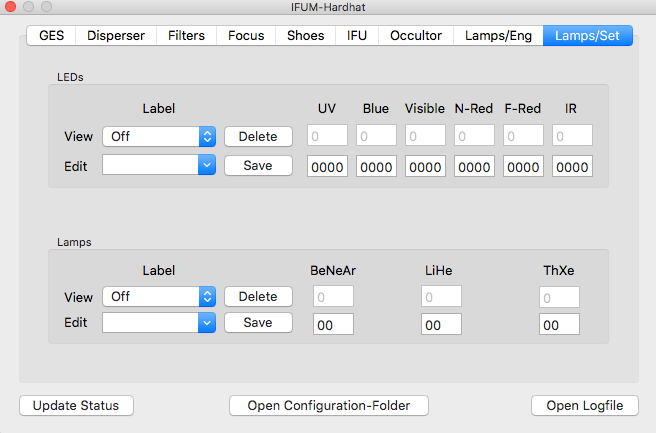
- LEDs: Define the combos for the LED calibration lamps.
- View Selects the LED combo name (display only)
- Delete: Deletes the selected combo
- Edit: Select the LED combo to modify or create a new combo.
- Save: Saves these values as a new or modified combo.
- Lamps: Define the HC-Lamp combo
- View Selects the HC-Lamp combo name (display only)
- Delete: Deletes the selected combo
- Edit: Select the HC-Lamp combo to modify or create a new combo.
- Save: Saves these values as a new or modified combo.
RaspberryPi Terminal
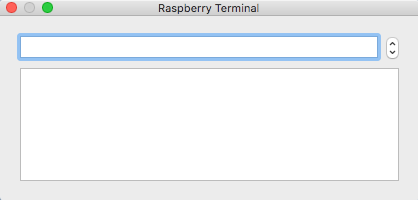
- Send the string in the edit window directly to the RaspberryPi.
- Warning: There is no error or limit checking! Use only if you know what you are doing.
Data Acquisition Windows
Camera-GUI , DataPaths , QL-Tool , DewarStatus , Voltages , Hardhat , Exposure ProgressCamera GUI
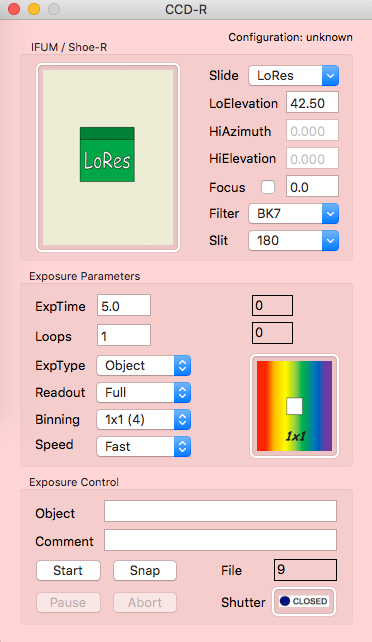
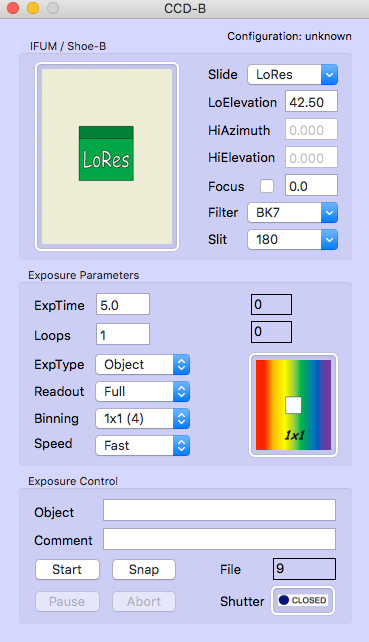
- IFUM / Shoe-X
- The title of the group box indicates which Shoe this camera is connected to (Fixed for IFUM).
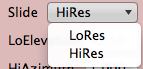
- Slide: selects the grating mode.
- LoElevation: sets the 'LoRes' elevation angle.
- HiAzimuth: sets the 'HiRes' azimuth angle.
- HiElevation: sets the 'HiRes' elevation angle.
- Focus: set the camera focus.
- The Check-Mark enables the AutoFocus feature:
- The GUI uses the cradle temperature to predict (see the IFUM-Hardhat) the focus and sends it to the RaspberryPi.
- Filter: selects the filter.

- Slit: selects the slit-position.
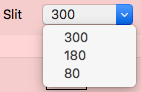
- Only the slits that are availabe with the current IFU are enabled.
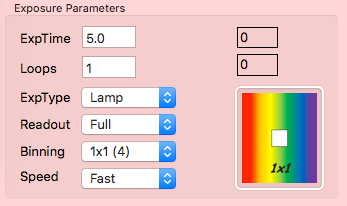
- Exposure Parameters
- ExpTime: sets the exposure time [s].
- Loops: sets the number of exposures that will be taken.
- ExpType: selects the exposure type.
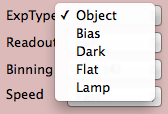
- The Flat and Lamp exposure types just affect the FITS header.
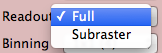
- Readout: selects the readout mode
- Binning: selects the binning
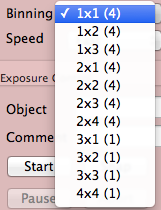
- Note that some binnings require a change of the number of readout amplifiers. This requires that the DSP code has to be reloaded. Please take a Snap exposure first to cleanup the array.
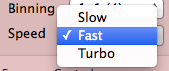
- Speed:
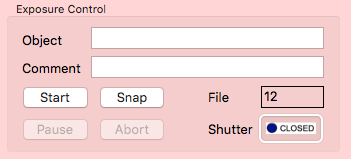
- Exposure Control
-
- Object: sets the "OBJECT" FITS keyword.
- Comment: sets the "COMMENT" FITS keyword.
- Start: starts an exposure loop.
- Snap: takes a Snap exposure with these settings:
- Loops=1, Readout=Full, Binning=4x4, Speed=Turbo
- The previous settings are automatically restored after the exposure.
- Note that the File number is not incremented.
- File: the file number of the next exposure (ccdNNNN.fits)
- Pause/Resume: pauses/resumes a running exposure.
- The shutter is closed and the exposre timer stopped until the exposure is resumed.
- Abort/Stop: stops/aborts an exposure (loop).
- Stop: During integration the shutter is closed and the readout starts right away.
- Abort: aborts the current readout and cleans the array (no data is written to disk).
- Shutter: current shutter status
- Note: This does not rely on any feedback (sensors) from the shutter; it is just a 'should be' status.
DataPaths Window
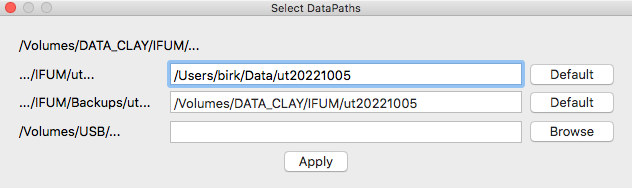
- .../IFUM/ut...: primary data path
- The Default button creates the standard path
- .../IFUM/Backups/ut...: secondary data path (optional)
- The Default button creates the standard backup path
- /Volumes/USB/...: A third data path that may be used to write to a user supplied USB disk.
- The Browse button opens a File Selector dialog.
Dewar Status
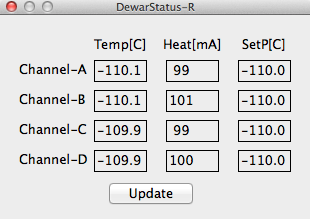
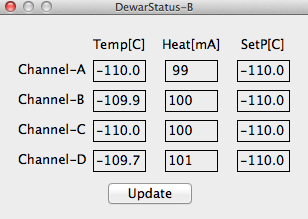
- This window shows the temperature sensors and the temperature control loop status of the DSP (CCD electronics).
CCD Voltages
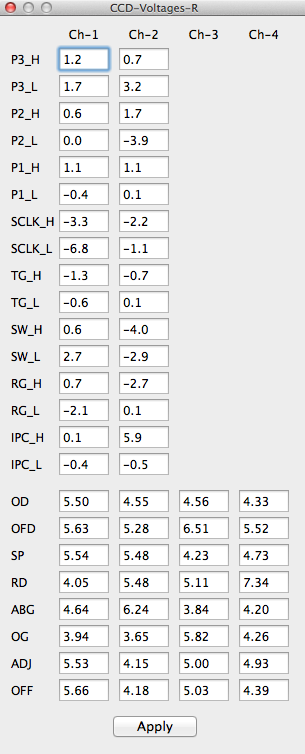
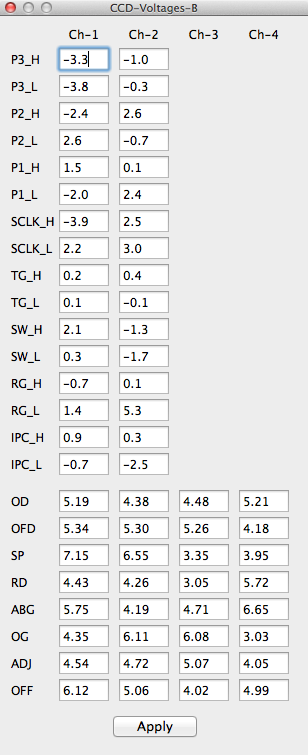
- Note: The voltages on the images above are not the actually used ones. They are for illustration only.
- This window is only available in engineering mode (Preferences).
CCD Hardhat
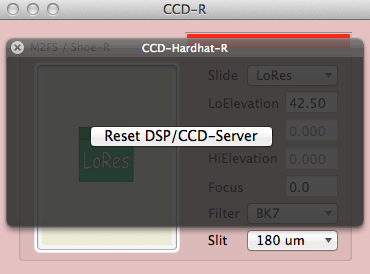
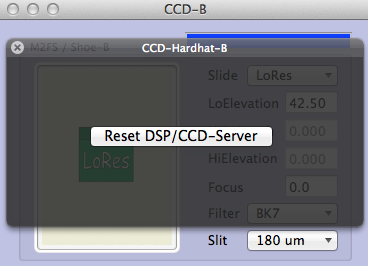
- Reset DSP/CCD-Server: Forces an upload of the DSP code.
Exposure Progress
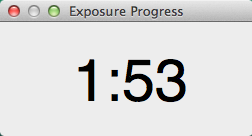
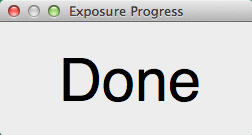
The Exposure Progress windows shows the time until the end of the current exposure loop. The counter stops during readout and switches to Done when the loop has finished.
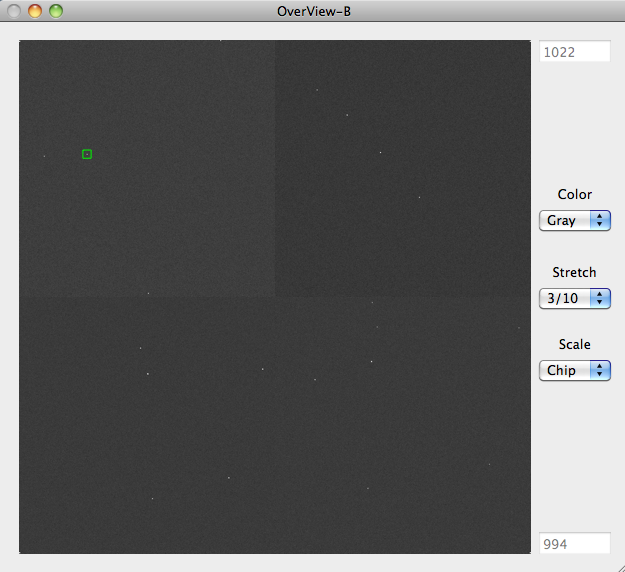
QlTool Window(s)
The 'Quick-Look' tool displays all four quadrants (pixel averaged) in the 'Overview' window at the proper sky orientation. The data can be viewed at various color mappings and may be scaled manually or automatically. The scaling algorithm may be set to use the entire data range of all four quadrants or scale each indiviual array separately to improve contrast.
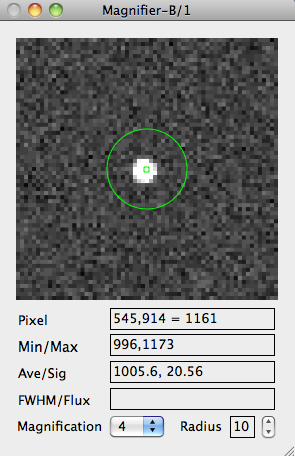
The magnifier window allows the observer to zoom into any area and inspect the data. The tool shows the minimum and maximum pixel values and also calculates the average and standard deviation within a circular aperture of a given radius. Finally the tool calculates an estimate of the FWHM (in pixels) of an object at the cursor position.
Telescope Windows
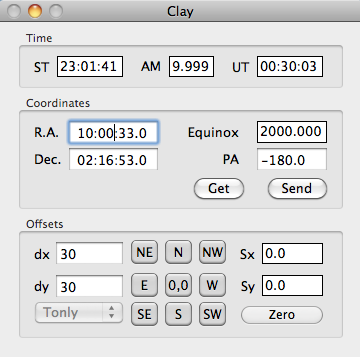
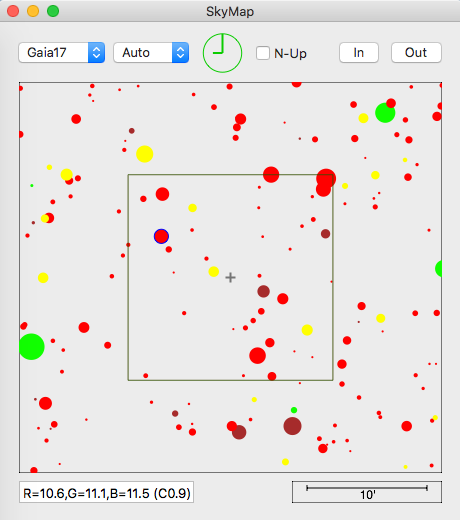
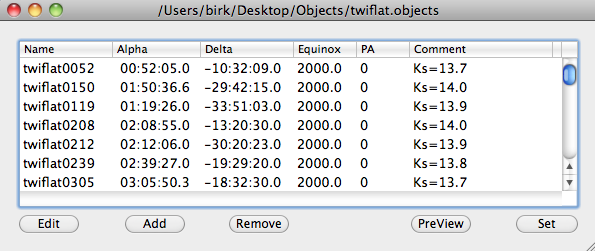
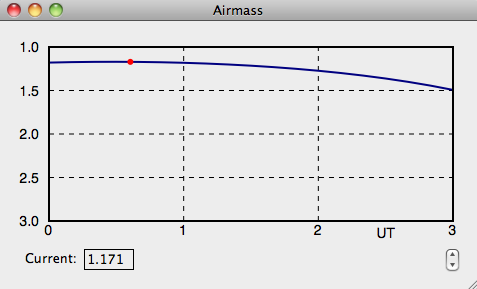
TeleGUI, SkyMap, ObjectList, AirmassTeleGUI
The 'Tele-GUI' displays basic telescope related information like coordinates, current airmass and sidereal time. It allows the observer to initiate small offsets.
SkyMap
The 'SkyMap' window displays a star catalog (GSC, USNO-A, 2MASS) superimposed on the field-of-view of the four arrays. The view may be zoomed-in or -out. A 'click' on a star reveals its brightness (eg. J,H,Ks magnitudes for the 2MASS catalog). Each exposure taken leaves an imprint of the arrays on the map. This allows the observer to visually track the progression of a dither-macro.
ObjectList
The 'Object-List' window can load simple ASCII files (format) created by the observer in preparation for each run. Entries may be edited or created "on-the-fly". The coordinates of any object may be sent directly to the TCS (telscope control system), thus avoiding communication errors between the telescope operator and the observer. The object-list display may be sorted by any of its fields by clicking on the column header.
Airmass
The 'Airmass' window displays the change in airmass over time at the current pointing. The GUI can be set to any coordinates without moving the actual telescope, allowing to predict the airmass development of objects in the object-list.
File Formats
Object Lists , FITSObject Lists
ExampleName | R.A. | Dec. | Equinox | PA | Comment HR0024 | 00:09:21.0 | -27:59:16 | 2000.0 | 0 | V=5.4 HR0034 | 00:11:34.4 | -27:47:59 | 2000.0 | 180 | V=5.4 HR0084 | 00:21:31.2 | -28:58:54 | 2000.0 | 180 | V=5.2
FITS
Examples: TODO Red , Blue
2012-03-22, Christoph C. Birk, Carnegie Observatories