FourStar Software Documentation
Cooldown Procedure
![]()
![]()
Location of this document: http://instrumentation.obs.carnegiescience.edu/Software/FourStar/cooldown.html
FourStar Warmup
FourStar Software Documentation
Note:It is recommended to test the detector system warm before cooling down the system to ensure that all components/cables are ok, but it is important that the JADE power is off during cooldown to avoid trapping charges in the H2RG arrays.
Startup the FourStar software selecting just the Detector- and Optics-Temperature controllers, Front- and Back-Temperature monitors and the LN2-Controller (if available):
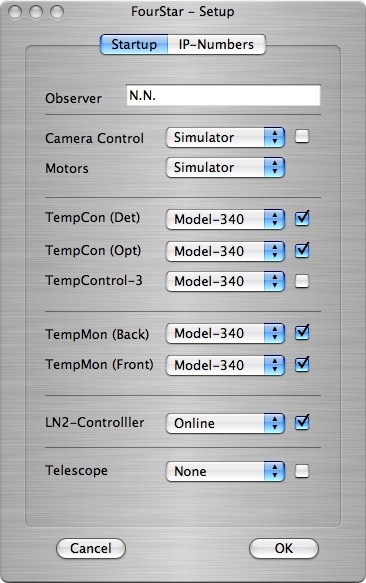
Both tanks should be empty at this time and at ambient temperature. The turbo-pump should be connected to the system and the ion-pump off.
Use the following settings on the temperature controllers:
| Setting | Detector Temp.Controller (TC1) | Optics Temp.Controller (TC2) |
| Target [K] | 75 | 199 |
| |Max| [K/min] | 0.4 | 0.02 |
| Range [W] | Off | Off |
| Meta | On | On |
| Setting | Detector Temp.Controller (TC1) | Optics Temp.Controller (TC2) |
| Target [K] | 75 | 199 |
| |Max| [K/min] | 0.4 | 0.02 |
| Range [W] | 50 | 25 |
| Meta | On | On |
Note: The system should be under constant supervision during the detector system cooldown. This procedure takes about 4-6 hours, please plan ahead.
Start filling the detector tank, while keeping an eye on
the Detector Heater output. If the heater output
starts oscillating then:
Once the heater output goes below 15% you should
switch the heater range to 5 [W]. After about
5 hours the cooldown rate will be slowing down to a point
where the heater will be effectively off, so you may
switch the Range to the off position
and let the detector temperature drift during the remainder
of the cooldown procedure. Once this point is reached
it is sufficient to only check the system status every few hours
to ensure the tanks are not running out of LN2.
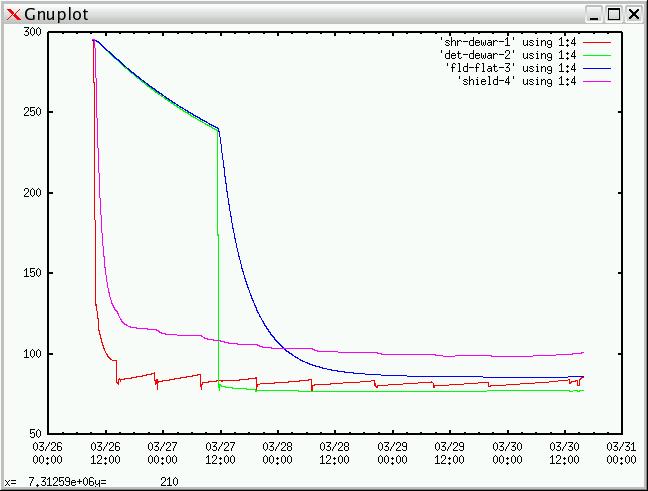
The diagrams below shows a typical cooldown: [todo use latest cooldown]

Once both tanks are cold you may turn-on the ion-pump. It is recommended to leave the system on the turbo-pump as long as possible.
| Setting | Detector Temp.Controller (TC1) | Optics Temp.Controller (TC2) |
| Target [K] | 80 | 200 |
| |Max| [K/min] | 0.1 | 0.02 |
| Range [W] | 0.5 | 25 |
| Meta | On | On |
2012-01-30, Christoph C. Birk, Carnegie Observatories